Showing posts with label Striping Tape. Show all posts

Monday, November 3, 2014

Halloween came and went!

I love Halloween. You may not believe me after all of Tiff's takeover but I have been waiting for ten months this year for Halloween so I am definitely sharing my costume (which included nails) with you guys.

Last Christmas, my wonderful boyfriend got me the greatest present ever: necomimi brainwave cat ears. I wore them for three weeks straight until the motor messed up, and then we sent them back for warranty coverage and got a new pair which have worked perfectly since then.

So obviously, cat.

To start my nails, I put down Essie Licorice and went to bed. I wore that by itself a whole day because my next step was taping and I hate taping. My polish is never dry enough. I figured after an entire day I couldn't go wrong! (I was right, it was at least dry enough :D).

I gathered my supplies the next night: striping tape, tweezers, nail clippers (to cut up striping tape) and set to work.


Last time I tried making pointy claws (years ago, pre-blog), I did black around the sharpened points. This time I wanted the outer parts of my nail to blend in with my fingers more, and give the illusion of sharp talons without any filing involved. I used China Glaze Dress Me Up and carefully applied it around the edges.


Next, I took Gosh Holographic Hero and painted the middle. Because I wanted a black outline around the claw, I left a bit of black near the cuticle and hoped it would be the right thickness.


After that, I used tweezers to pick off the tape and VOILA!


For anyone who wants to try this, a tip: try to pull off one piece of tape at a time, otherwise at the thinnest point the polish will lift with the tape.


I am so happy with the way this came out, and from afar it gave exactly the effect I wanted.

(If anyone wants more pictures of my costume, I flooded my instagram...)

I love Halloween! Tell me about yours and show me your costumes!

Saturday, August 2, 2014

Swatch: Rainbow Honey I Wanna Get Better

Hello everyone! Voting is still up, check it out plstthx!

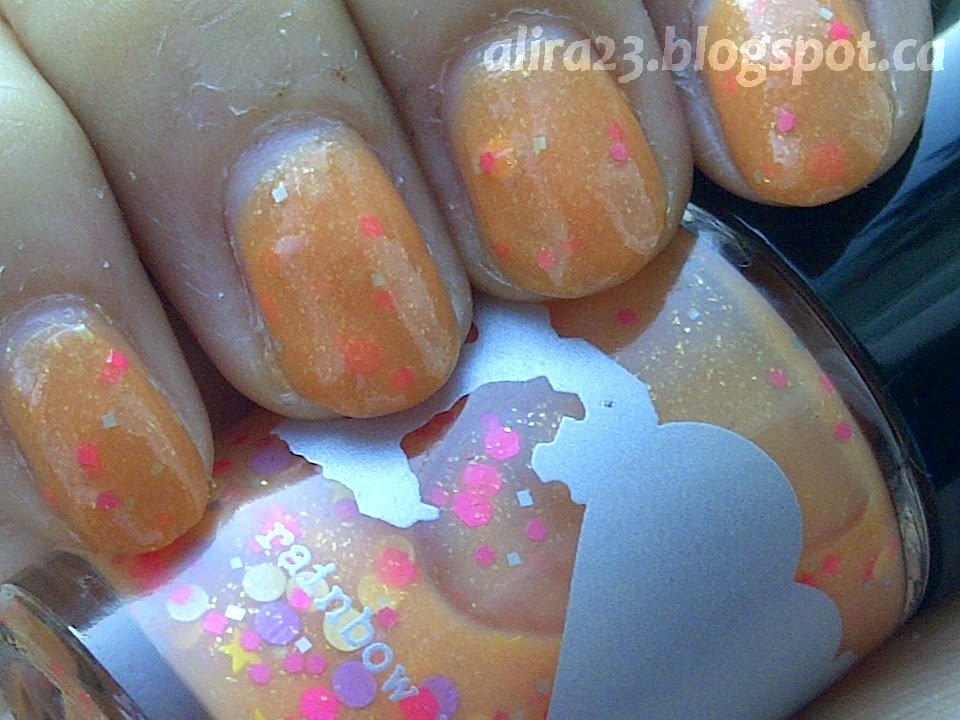
Today I have one of Rainbow Honey's new Summer Mixtape collection polishes called I Wanna Get Better which I receieved free in exchange for my honest review.

It's a peachy crelly full of neon glitter and little stars. It built up extremely well and I used four coats but it was good in 3.


The colour isn't my favourite next to my skin tone and I'm not sure why because in the sun and at a distance it looks absolutely chic but I'm not feeling it. This may be a colour that designates to my toes. I also think it would be amazing on someone with darker skin than mine.

Because I for some reason didn't get very many of those little purple glitters I decided to accent the orange with some purple. RH Viola (yet to be swatched) was the exact same colour! Unfortunately due to the UV capability of my camera it captures more blue than it actually is. It's a warm neon purple in real life. Anyway, here's my taping...


I am not the best at abstract-y designs. I finished up by mattifying.


Not gonna lie, looks pretty nice.


That last photo is the best I think. Viola is still too blue-hued but matte was definitely the way to go!

What do you think? How do I do better tape manis D:

Check out Rainbow Honey on Facebook and their website. Currently for the Summer Mixtape collection you can get 20% off your entire order until August 18 using the code MIXTAPE20. Get some pretty colours!

Monday, June 30, 2014

Swatch: Rainbow Honey Stellar Treat + Nail Art

Yeah man! I think I got the hand of striping tape! The trick is not to use scissors but nail clippers to get the cut as close as humanly possible. Hurrah!

But first, here's a swatch of RH Stellar Treat over RH Apple Kid. I don't know if you can see those adorable tiny stars because Apple Kid ate them a little bit but if you chose a more contrasting colour it would look spectacular. As it is, you get little holographic flashes out of them this way.


I only painted my middle and ring fingers with them.


Then I decided accent nails were not enough. I dug up my silver striping tape and some really old nail stickers (I think they're Kiss).


Painted another half of my pinkie and index with Stellar Treat and diagonal on my thumb, stuck down the stickers, topcoat and there! Simple but pretty.


I'm so glad there's been some sunshine lately, it really makes it so much easier to take pictures.

Would you ever go this girly on your nails?

Wednesday, September 25, 2013

NCC#3 Techniques: Striping tape!

Ahhh I have a love/hate relationship with striping tape, which is mostly doused in frustration. But the stuff is just so cheap for so much of it, I can't not use it once in a while! So today, I swallow my disdain and I bring you an idea that actually turned out alright.

My original inspiration... I was thinking of dragons for some reason.

I started with Fingerpaints Avant Garde Green, obvs (what other colour would be perfect for dragons??) and then started placing and snipping. I did one thumb first, so I could see how it came out.


It totally worked though, so I moved on.


And I'm including this to prove I did BOTH HANDS :D

Oh! I never told you what I planned to put on top. Remember crackle topcoats? ;D I'm bringing it back! IT LOOKS AWESOME. I used Julep Glinda, from last year's Halloween box (or October box, who knows) and it looks pretty sweet... Enough of that, just look.


(I topped it with my increasingly gloopy Seche)


:DDDD So, not quite dragons, it definitely makes me think of SLYTHERIN :D  That's totes alright with me because Slytherin's are badass and I have before been sorted into that house, where I'm sure I would be absolutely happy because we/they are the aforementioned badass.

So there you have it! I promise my last technique will be one I have NEVER done before, so keep coming back!


Monday, August 5, 2013

August NCC#1: Around the World - Vancouver Pride!!

I managed to finish last month's entire challenge :D Hurrah! Apparently flowers are fun! And now it's time for the August theme which is around the world which I'm kicking off with Vancouver Pride, since that was yesterday =3 Also as an excuse to do rainbows and to lead into talking about something really important (probably tomorrow).

I started with Gosh Holographic Hero. I took a picture for you because last time I swatched this I worked really hard to make it perfect and this time I just did two coats and it turned out alright =3


Alright! So there's a start, a base of rainbows =3 Now, in honour of Davie street's permanent rainbow crosswalks, I pulled out my dreaded striping tape.

Side note: What I really wish I could have done is used textured polishes to mimic the coloured concrete but alas, I don't own the Zoya Summer PixieDust collection in full (YET!)


And... (I mean, obviously)...


I used Julep January and Leah and Essences Wake Up!, Wanna Be Your Sunshine, Let's Get Lost and Passion for Fashion. I recommend actually not using the Essences for this if you're gonna try it (at least, not the old formula ones) since they got tacky and, as you can see on the thumb, didn't pull off clean. But, judging by that behaviour, they're gonna be great for sugar spun nails.

On my index finger, I put two coats of Rainbow Honey 20% Cooler.


It needed some topcoat, so that was another opportunity for more rainbows =P I used Piper Polish Spectraflair topcoat.


See there? I had to pull the tape off really carefully and make sure that the tacky bit fell on my skin rather than across all the other colours D: what a nightmare. Not as bad as I thought striping tape would be though. The hardest part was finding the end to get it all unrolling in the first place.

SUNSHINE:


 Both hands turned out pretty good apparently!


Did any of you do Pride nails?

Take a trip around the world!